

Create a Tiger Cloud account
Create a Tiger Cloud account on the Tiger Data website, or through AWS Marketplace or Azure Marketplace, including accepting a private offer
You create a Tiger Cloud account to manage your services and data in a centralized and efficient manner in Tiger Console. From there, you can create and delete services, run queries, manage access and billing, integrate other services, contact support, and more.
You can sign up on the Tiger Data website, or subscribe through AWS Marketplace or Azure Marketplace. If you subscribe through a marketplace, Tiger Cloud is a line item in your cloud provider's invoice.
You create a standalone account to manage Tiger Cloud as a separate unit in your infrastructure, which includes separate billing and invoicing.
To set up Tiger Cloud:
- Sign up for a $1000-credit, 30-day free trial
Open Sign up for Tiger Cloud and add your details, then click
Start your free trial. You receive a confirmation email in your inbox. - Confirm your email address
In the confirmation email, click the link supplied.
- Select the pricing plan
You are now logged into Tiger Console. You can change the pricing plan to better accommodate your growing needs on the
Billingpage.
To have Tiger Cloud as a part of your AWS infrastructure, you create or link your Tiger Cloud account through AWS Marketplace. In this case, Tiger Cloud is a line item in your AWS invoice.
AWS Marketplace offers Tiger Cloud as a public offer at standard pricing, or as a private offer if you negotiated custom pricing or contract terms with Tiger Data.
Subscribe to an AWS Marketplace public offer
Section titled “Subscribe to an AWS Marketplace public offer”To set up Tiger Cloud via AWS:
- Open AWS Marketplace and search for
Tiger CloudYou see two pricing options, pay-as-you-go and annual commit.
If you negotiated custom pricing or contract terms with Tiger Data, you receive a private offer instead. See Accept an AWS Marketplace private offer.
- Select the pricing option that suits you and click
View purchase options - Review and configure the purchase details, then click
Subscribe - Click
Set up your accountat the top of the pageYou are redirected to Tiger Console.
- Sign up for a $1000-credit, 30-day free trial
Add your details, then click
Start your free trial. If you want to link an existing Tiger Cloud account to AWS, log in with your existing credentials. - Select the pricing plan
You are now logged into Tiger Console. You can change the pricing plan later to better accommodate your growing needs on the
Billingpage. - In
Confirm AWS Marketplace connection, clickConnectYour Tiger Cloud and AWS accounts are now connected.
Accept an AWS Marketplace private offer
Section titled “Accept an AWS Marketplace private offer”If you negotiated custom pricing or contract terms with Tiger Data, you receive a private offer in AWS Marketplace. Accepting it takes two parts:
- Accept the offer in AWS. This creates the agreement.
- Link the subscription to a Tiger Cloud project. This is what routes your database usage to AWS billing.
Both parts are required. Accepting the offer on its own does not change how your services are billed.
Prerequisites for this procedure
To follow these steps, you'll need:
- Your 12-digit AWS account ID. The offer is targeted at a specific AWS account and is only visible from that account. If your organization has several accounts, confirm with your Tiger Data representative which one the offer was issued to.
- Permission in AWS Marketplace to view and accept private offers, and to create Marketplace agreements. This usually means the
aws-marketplacesubscribe and agreement permissions, or an administrator role. It does not have to be the person the offer was emailed to. - A valid AWS payment method. AWS must be able to create the agreement. If your account cannot create Marketplace agreements, you cannot accept the offer.
- The Tiger Cloud project that the offer bills for. Billing is linked at the project level, so decide which project the offer applies to before you start.
- The offer expiration date. Private offers expire, and an offer you do not accept in time has to be reissued.
Accept the offer in AWS
Section titled “Accept the offer in AWS”- Open the private offer
You can reach the offer in two ways:
- Click the link Tiger Data sends to your contact.
- In the AWS Console, go to
AWS Marketplace>Manage subscriptions>Private offers, or toDiscover products>Private offers. Offers only appear for the AWS account ID they were issued to.
Under
Available offers, select your offer, then clickView details.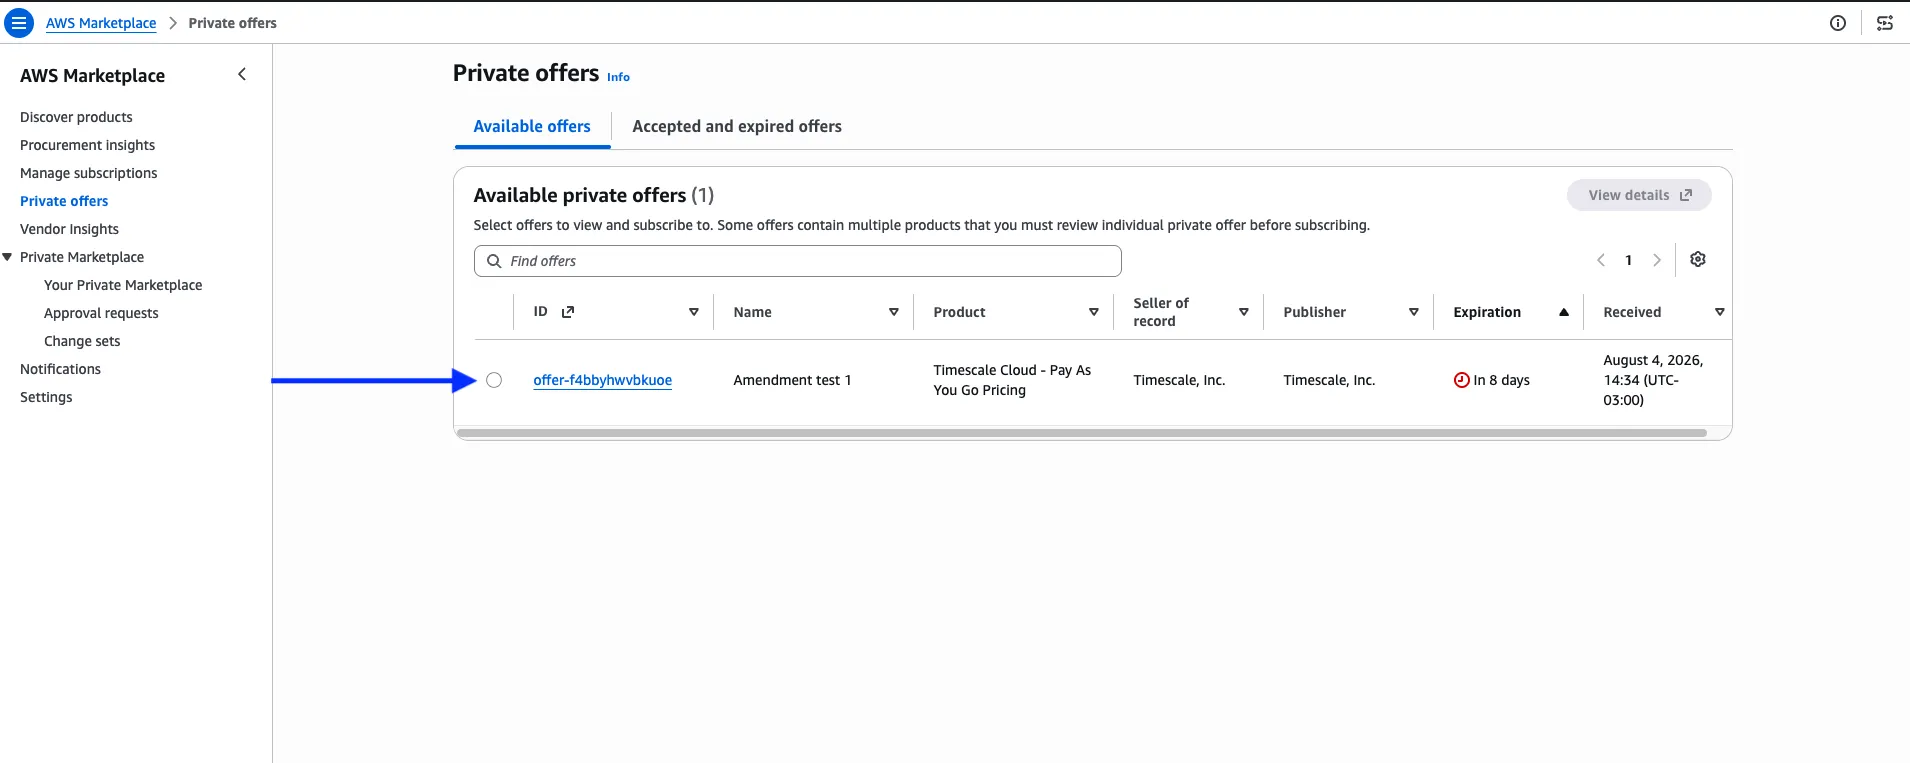
Alternatively, in
Discover products, open the Tiger Data listing and clickView purchase options. UnderYour offers, keepAvailable to purchase offersselected, then choose the row with the offer typePrivate offer.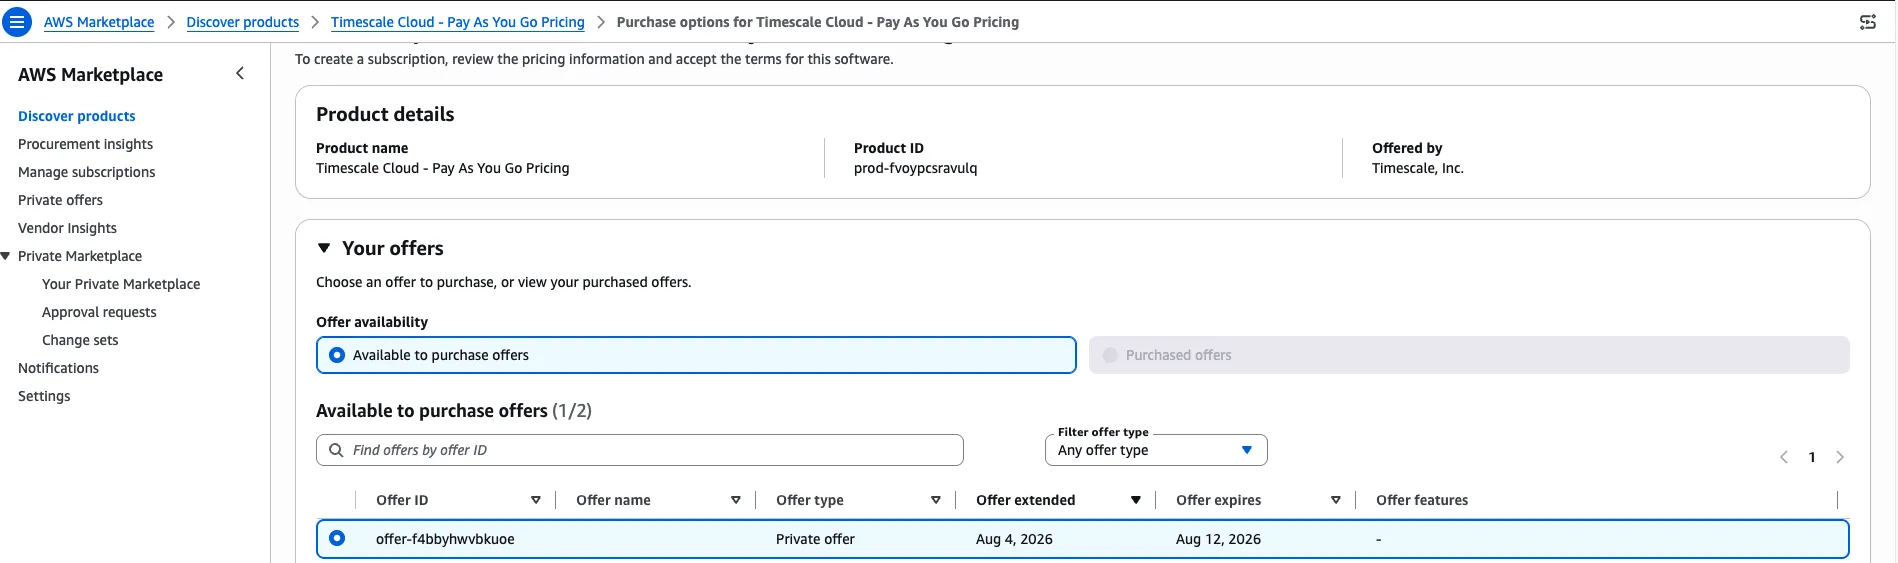
- Review the offer details
The offer page shows:
- Pricing and units: your negotiated rates.
- Contract duration: the start and end dates.
- Payment schedule, if you agreed on a scheduled payment plan.
- End-user license agreement (EULA) and contract terms: the AWS standard contract, the standard Tiger Data EULA, or a custom agreement negotiated for you.
- Offer expiration date: the deadline to accept.
The page also includes a
Download EULA(s)button, an optional purchase order number, and a purchase details summary with the offer ID and currency. TheAccept offerbutton sits at the bottom right. Confirm that all of this matches what you agreed with your Tiger Data representative before you continue.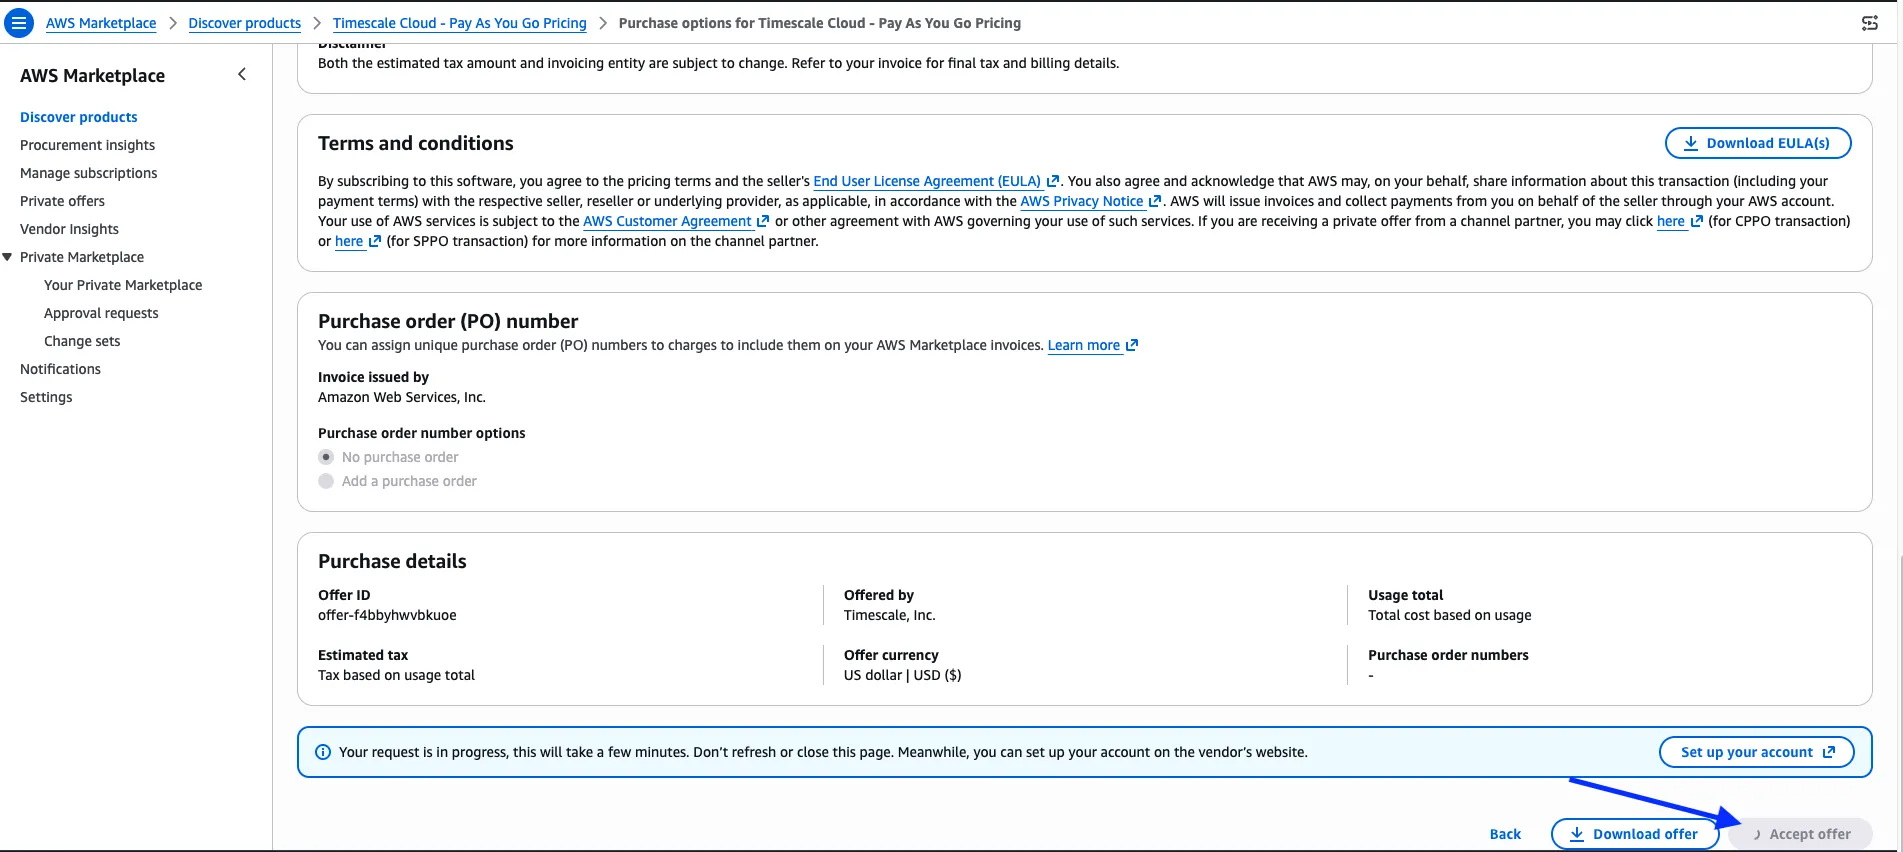
- Accept the offer
Click
Accept offerat the bottom right of the purchase options page, then confirm the terms. Depending on the offer type, the button can readView purchase options,Accept Terms, orCreate contractinstead.AWS now creates the agreement, which takes a few minutes.
WarningDo not refresh or close the page while AWS creates the agreement.
When the agreement is ready, you see a purchase confirmation page with the agreement details, agreement ID, status, license ID, and service start date. The subscription now appears in
Manage subscriptionsalongside your other AWS Marketplace products.If Tiger Data also provided an order form for this deal, sign and return it. The order form is the commercial record on the Tiger Data side, and covers anything the Marketplace agreement does not.
- Continue to account setup
Click
Set up your accounton the confirmation page. You are redirected to Tiger Console and prompted to sign in.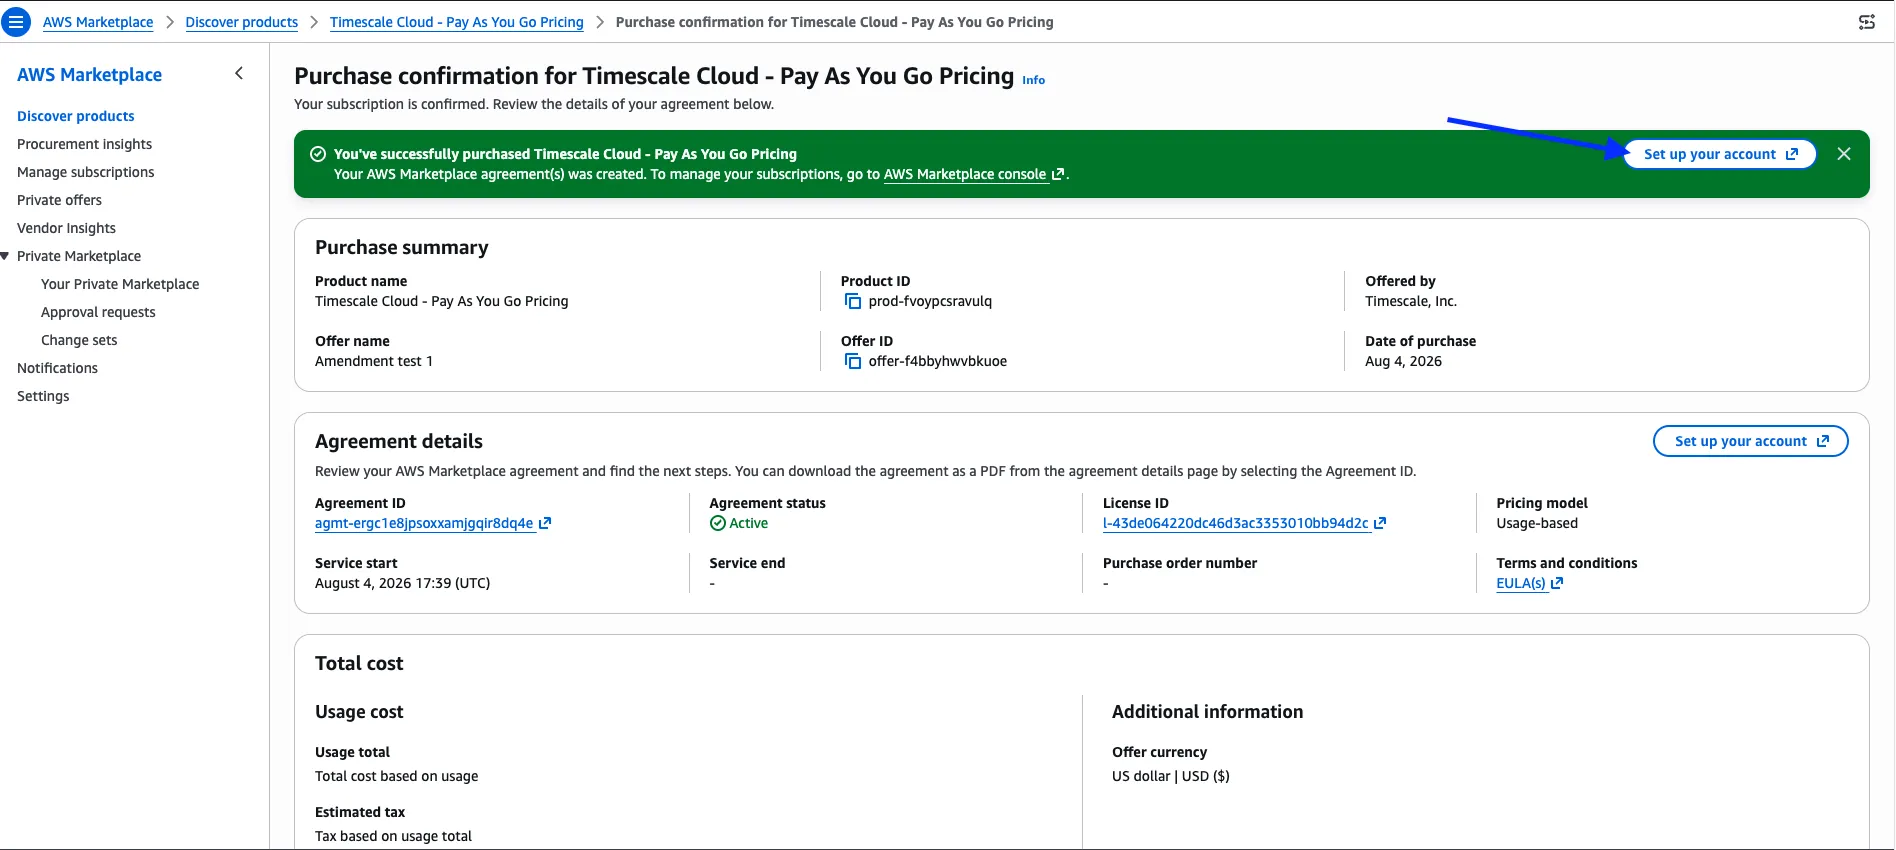
If you have already navigated away, go to
AWS Marketplace>Manage subscriptions> your Tiger Cloud agreement, then clickSet up productat the top right. This takes you to the same place.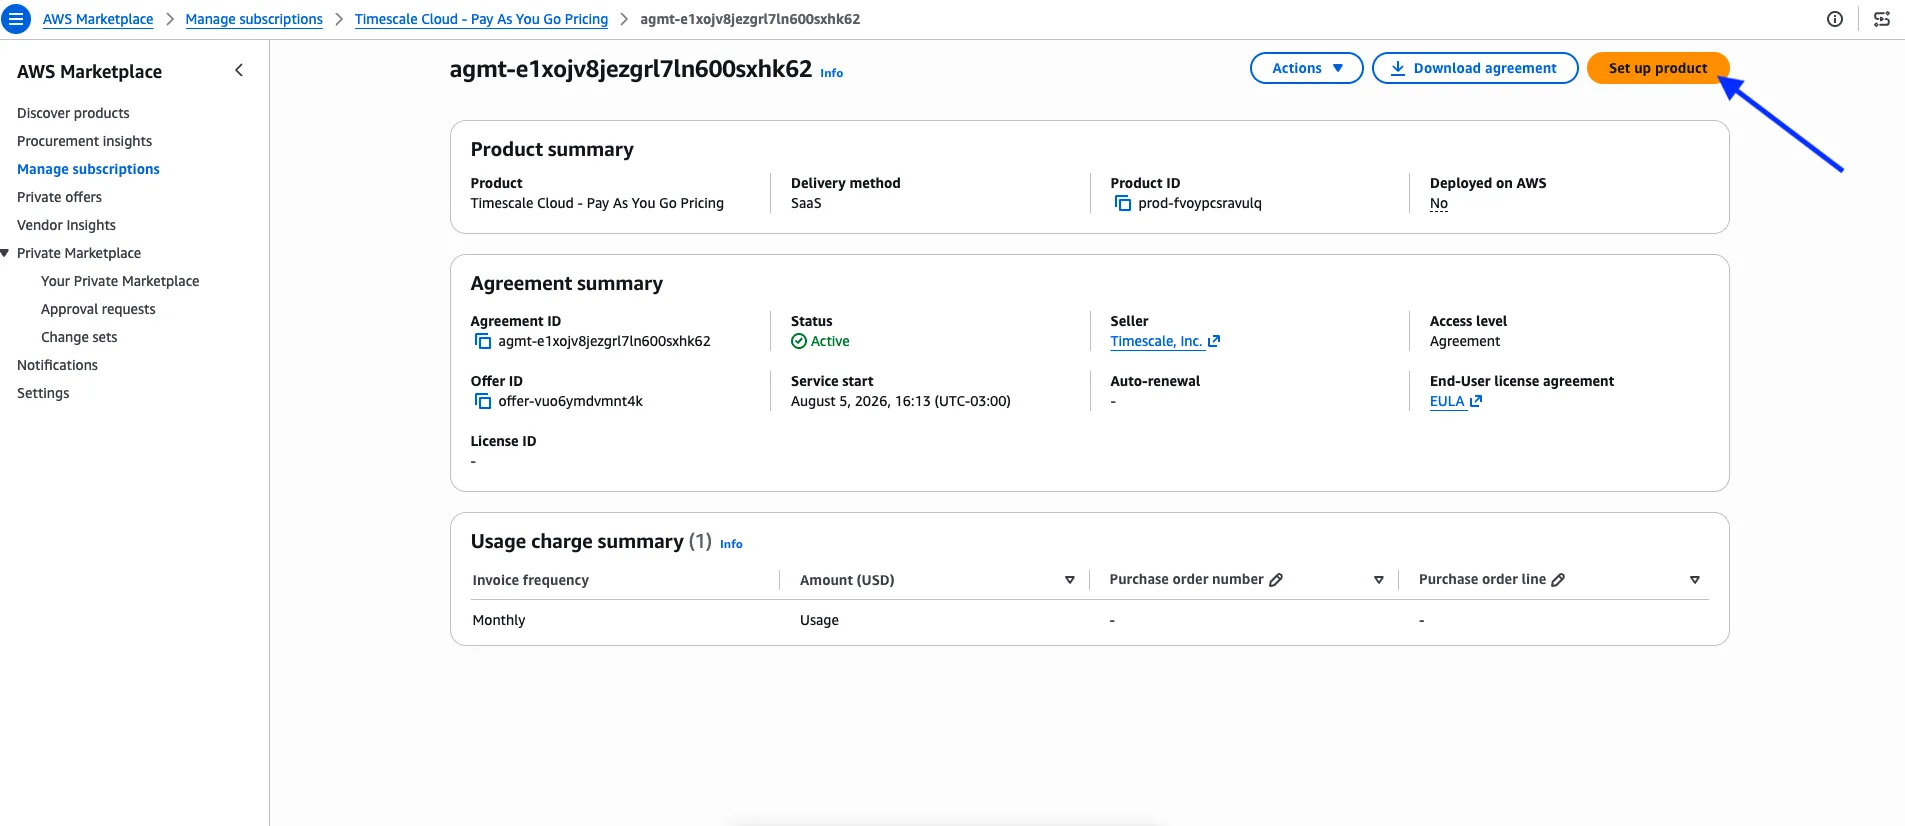 Important
Do not skip this step. It connects your AWS agreement to your databases. Until you complete it, your Tiger Cloud usage is still billed to your previous payment method.
Link the offer to your project
Section titled “Link the offer to your project”- Sign in to Tiger Cloud
The redirect from AWS opens the Tiger Cloud sign-in page.
- Existing customers: log in with your existing credentials. Do not create a new account, because that creates a second, empty project.
- New customers: follow the prompts to create your account.
When you are signed in, the connection dialog opens automatically.
- Select the project to link
In
Confirm AWS Marketplace Connection, use theChoose a Tiger Cloud project to connect to AWSdropdown to select the project that the Marketplace subscription applies to.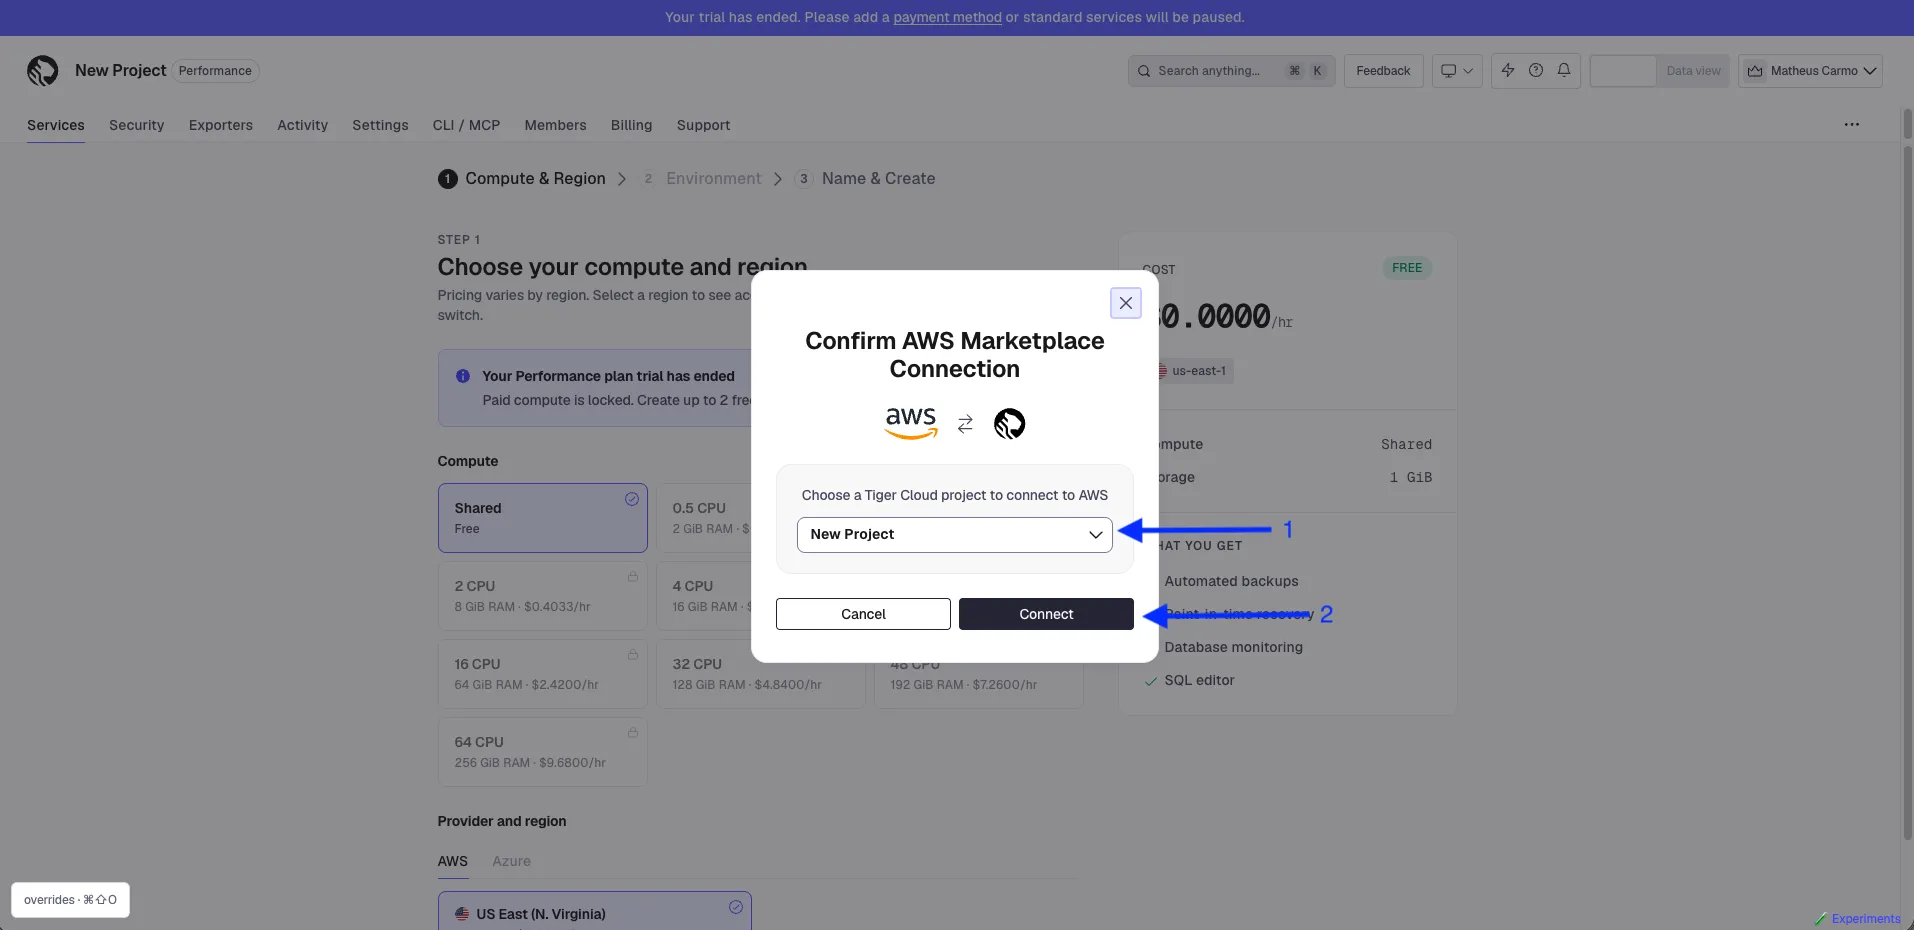
Keep the following in mind:
- Billing is linked at the project level, not per individual service. Every service in the selected project is billed through AWS from this point on.
- If your services are spread across several projects, only the project you select here moves to AWS billing.
- An AWS Marketplace subscription can be linked to one project only, globally. You can have only one active Tiger Data private offer per AWS billing account.
- Confirm the connection
In the same dialog, click
Connect. Once connected:- AWS Marketplace becomes the primary payment method for that project.
- Any existing payment method, such as a credit card or direct invoicing, is demoted and no longer charged. If your private offer starts partway through the month, you receive two invoices: one for the period before the private offer, billed to your previous payment method, and one billed through the private offer.
- Your negotiated private offer pricing applies.
You see an
AWS Marketplace Connectedconfirmation naming the linked project. ClickStart using Tiger Cloud.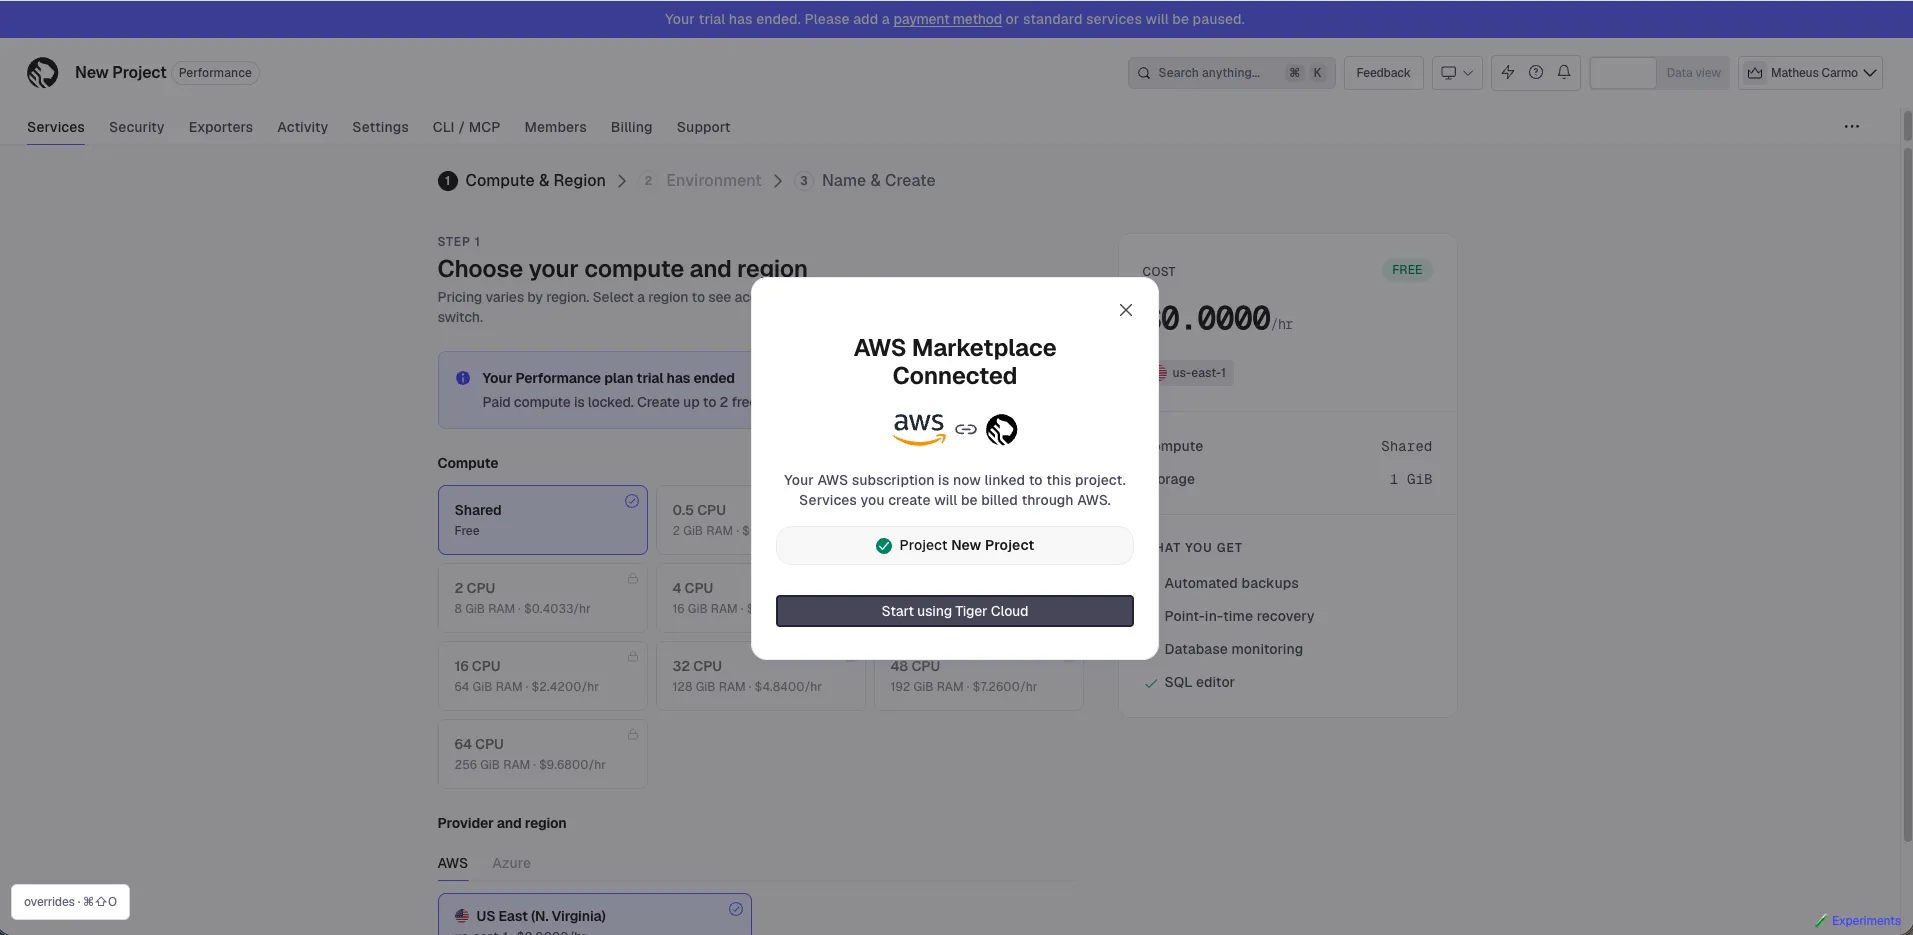
- Verify the connection
In Tiger Console, go to
Billing>Wallet. It shows that the project is billed through AWS Marketplace.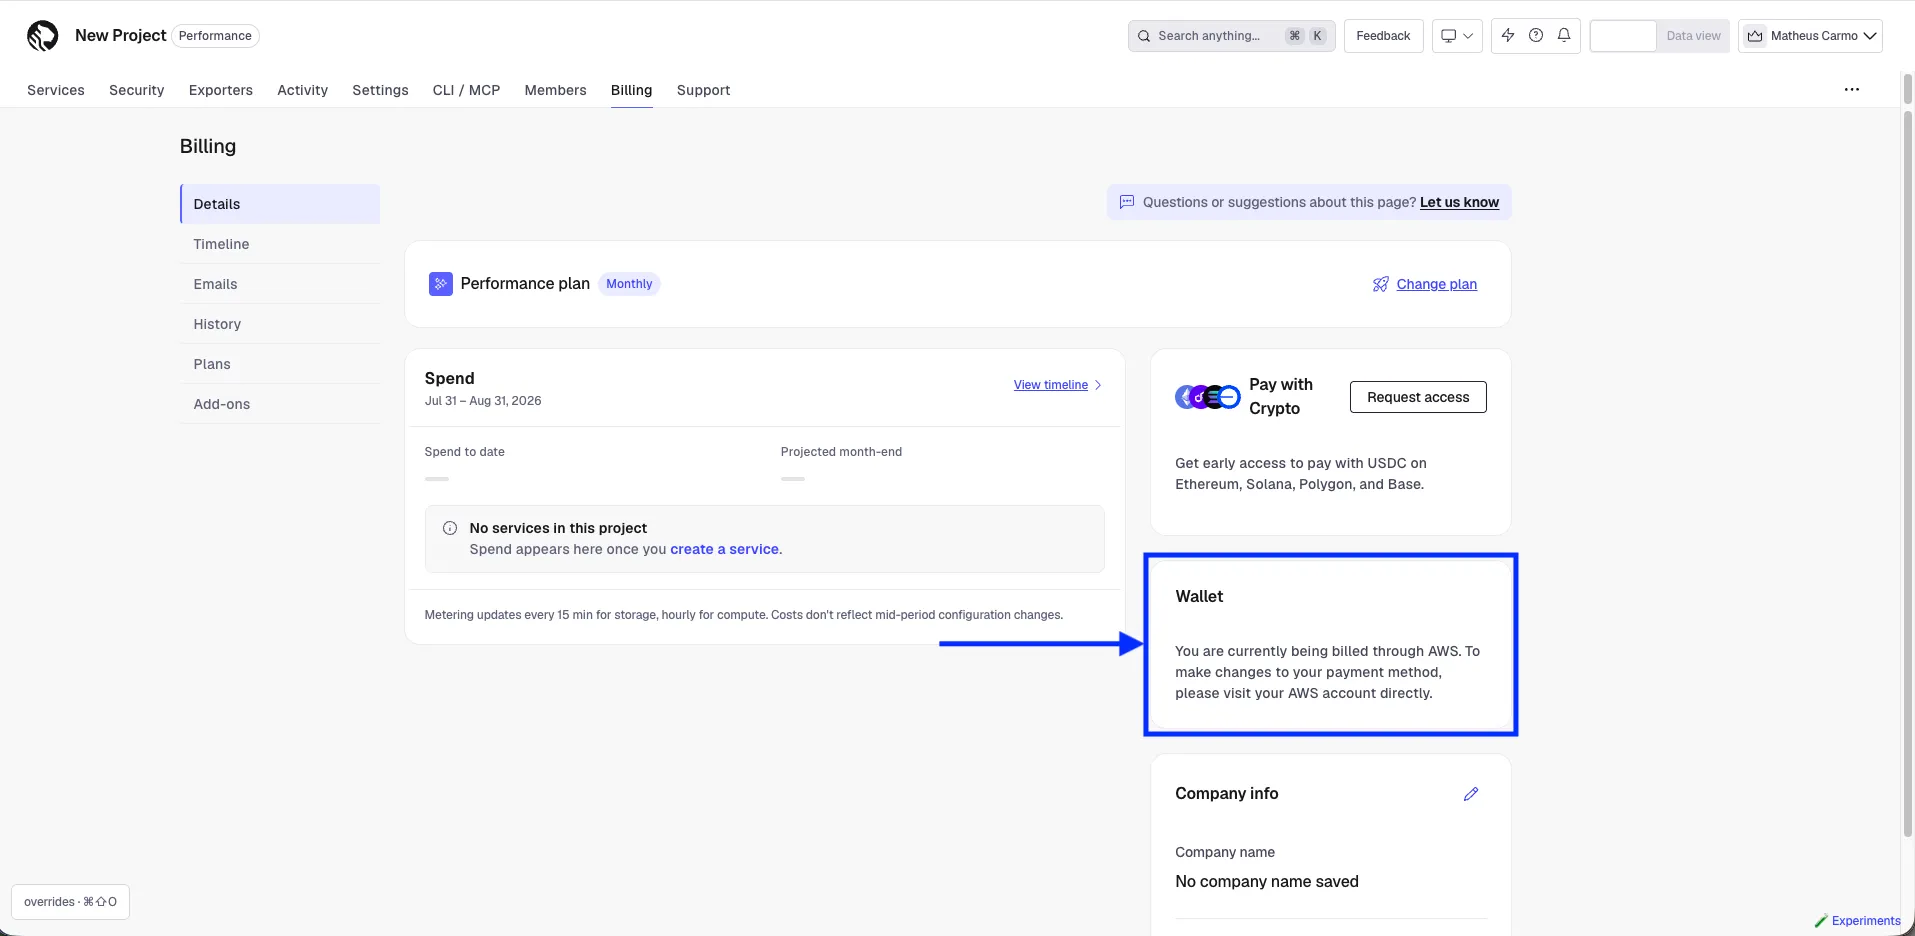
Your running services are not affected. There is no downtime, no restart, and no change to your connection strings. Nothing about the way you access your databases changes.
Confirm completion with your Tiger Data representative so they can verify the link on the Tiger Data side.
AWS billing for private offers
Section titled “AWS billing for private offers”- Billing line item: your Tiger Cloud usage appears as a line item on your AWS invoice.
- AWS commit: spend through the private offer draws down an Enterprise Discount Program (EDP) or Private Pricing Agreement (PPA) commitment, if you have one.
- No separate Tiger Data invoice: once the subscription is linked, you are billed by AWS, not by Tiger Data.
- Invoices in Tiger Console: invoices are intentionally hidden in Tiger Console for Marketplace customers, because Tiger Data totals and the AWS invoice can differ by a few dollars in the way usage is rolled up. To track your current month usage, see the
Estimatespage in Tiger Console. If you need itemized Tiger Data detail, ask your Tiger Data representative.
For more information about Tiger Cloud pricing on AWS, see Billing and account management.
To have Tiger Cloud as a part of your Azure infrastructure, you create or link your Tiger Cloud account through Azure Marketplace. In this case, Tiger Cloud is a line item in your Azure invoice.
- Open Azure Marketplace and search for
Tiger DataYou see two pricing options, pay-as-you-go and annual commit. Select and click the right pricing option.
- Review product details
Review the details for the pricing option you have selected, then click
Subscribe. - Configure project and SaaS details
Select the Azure subscription and resource group, provide a name for your subscription to Tiger Cloud, configure auto-renew settings, then click
Review & subscribe. - Review the legal terms
Review the Terms of use, Privacy policy, and your subscription basics, then click
Subscribe. Your SaaS resource is being created. - Click
Configure accountYou are redirected to Tiger Console.
- Sign up for a $1000-credit, 30-day free trial
Add your details, then click
Start your free trial. If you want to link an existing Tiger Cloud account to Azure, log in with your existing credentials. - Select the pricing plan
You are now logged into Tiger Console. You can change the pricing plan later to better accommodate your growing needs on the
Billingpage. - In
Confirm Azure Marketplace connection, clickConnectYour Tiger Cloud and Azure accounts are now connected.
Now that you have an active Tiger Cloud account, create your first Tiger Cloud service.